


1. Introduction
This document describes in-depth the Payment Links functionality.
1.1 Overview
The Payment Links allow secure ecommerce payments without requiring any integration with the ecommerce platform, leveraging the respective Web admin tool, which is the secure environment where the merchant creates the payment links.
Payment links can easily be created for:
• Mail & Telephone orders
• Orders from other channels (e.g. Social Media, SMS)
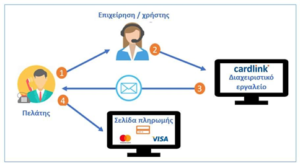
Image 1. Overview of the steps a Payment Link follows
The 4 steps are described in detail below:
- The customer communicates with the back-office agent (via email, telephone or social media) of the merchant and informs them for the product they want to buy.
- The back-office agent of the merchant will generate via the Worldline Payment gateway admin tool a Payment link.
- The payment link will be sent to the customer via the desired channel (email account, SMS or social media).
- The customer will click on the Payment link and will be directed to the payment page of the bank to perform the payment.
1.2 Getting started with Payment Links
Since Payment links are enhanced Mo/To payments, they are in the “Make Mail/Telephone order (MO/TO)” section, log in the BackOffice tool and select it to get started.
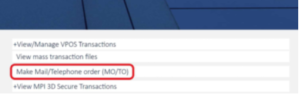
Image 2. Home Page with Mo/To section highlighted
Next sections describe in further detail how a new Payment Link can be generated and shared to the customer.
2. Payment link generation and sharing
There are 2 options available:
1. Send Payment Link directly via email
2. Generate Payment Link (for usage in other channels e.g. SMS, Social Media, etc)
Each of them is described further in the next sections.
2.1 Send via Direct Email
To send a Payment Link directly via Email follow the steps below:
1. Select “Payment Link” as Payment Channel (if present), as shown on Image 3 below.
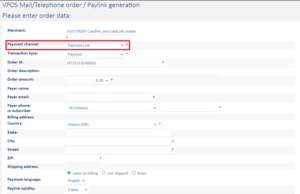
Image 3. Payment Link Page with Payment channel field marked
2. Fill the required fields of the form:
a. Transaction type
b. Order Id. There is always a pre-filled unique value, however you can set one of your own, given that it will be unique every time. For recurring transactions, maximum length is 45 character.
c. Order Amount
d. Payer email
e. Payer phone
f. Billing address: Country*
g. Billing address: City*
h. Billing address: Street*
i. Billing address: ZIP*
as well as any from the optional fields you wish.
*if they are present
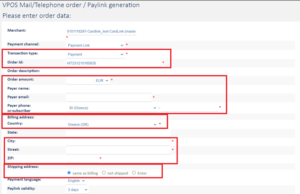
Image 4. Payment Link Page with required fields highlighted
In case you need to ship some goods, you will need to also fill in the respective shipping fields.
j. Shipping address: Shame as billing.
k. Shipping address: Enter. Shipping address is different than the billing address. If you choose that, then you need to fill in the respective fields, as shown in picture 4a.
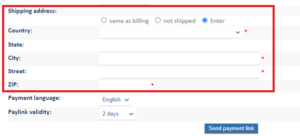
Image 4a: Shipping address fields
l. Shipping address: Not shipped. You may choose that option if no shipping of goods is to be made.
3. Set Paylink validity to the desired days the link should remain valid for, as shown on Image 4 above. The Default value is configurable.
4. Press the “Send Payment Link” button.
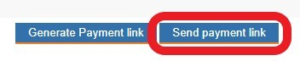
Image 5. “Send Payment Link” button
5. On the popup that follows, select “Confirm” as seen on Image 6.
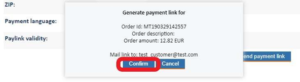
Image 6. Final confirmation
6. The link has been emailed to the customer.
Note: The supported languages are Greek and English. You may choose the preferred one using the field “Payment Language”.
2.1.1 E-mail template
The direct email using comes with the following template.

Image 7. Email Template
Merchant name, Shop URL, Amount & Order No are filled in dynamically from the BackOffice tool.
2.2 Generate and send manually
To send manually the Payment Link to the customer via the desired channel (email, SMS, Social Media, etc) follow the below steps:
1. Select “Payment Link” as Payment Channel (if present), as shown on Image 8.
Image 8. Payment Link Page with Payment channel field marked
2. Fill in the required fields of the form:
a. Transaction type
b. Order Id. There is always a pre-filled unique value, however you can set one of your own, given that it will be unique every time. For recurring transactions, maximum length is 45 character.
c. Order Amount
d. Payer email
e. Payer phone
f. Billing address: Country*
g. Billing address: City*
h. Billing address: Street*
i. Billing address: ZIP*
as well as any from the optional fields you wish.
*if they are present
Image 9. Payment Link Page with required fields highlighted
In case you need to ship some goods, you will need to also fill in the respective shipping fields.
j. Shipping address: Shame as billing.
k. Shipping address: Enter. Shipping address is different than the billing address. If you choose that, then you need to fill in the respective fields, as shown in picture 9a.
Image 9a: Shipping address fields
l. Shipping address: Not shipped. You may choose that option if no shipping of goods is to be made.
3. Set Paylink validity to the desired days the link should remain valid for, as shown on Image 9. above. The Default value is configurable.
4. Press “Generate Payment Link” button.
![]()
Image 10. “Generate Payment Link” button
5. On the popup that follows, select “Confirm” as seen on Image 11.
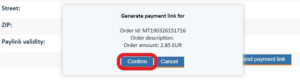
Image 11. Final confirmation
6. Copy the link from the next popup, as per Image 12. (either by clicking the “Copy” button or manually selecting and copying the link).
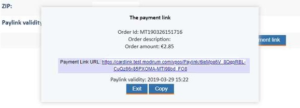
Image 12. Copy Generated Link modal
7. You are all set to send the link to the customer. Just paste it on the desired channel (SMS, Social Media, Email, etc).
3. Management of Payment Links
Payment links that have already been sent to the customer, can either get invalidated or re-sent. Each of them is described further in the next sections.
3.1 Invalidating a Payment Link
In case a sent link needs to be invalidated:
1. Navigate to the details of the transaction on the Backoffice tool.
2. Click on “Paylink cancel”, as seen on Image 13.
3. The Link is now invalidated.
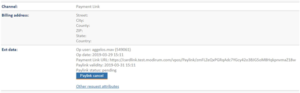
Image 13. Payment Link Invalidate
3.2 Resending a Payment Link
In case a Payment link sent with direct email failed to reach the customer, you can re-send it easily:
1. Navigate to the details of the transaction on the Backoffice tool.
2. Click on “Paylink resend”, as seen on Image 14.
3. The Link is now re-sent to the customer.
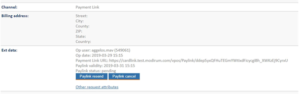
Image 14. Payment Link Resend
4. Track Payment Link info
The merchant can be informed for Payment Link transaction results via the below methods:
1. Search in VPOS transactions
2. Notification emails, after the transaction is successfully completed
3. In the merchant’s system, if the return URLs (cancel URL & confirm URL) are used
4.1 Search in VPOS transactions
To find a VPOS Payment Link transaction amend your search criteria with the below filter:
1. Navigate to “VPOS Transactions”
2. Select “Payment Link” in filter Input Channel as seen on Image 15.
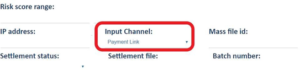
Image 15. Search Filter
You can easily check the status of a Payment Link from the transaction search, as shown below:
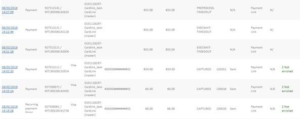
Image 16. Payment Links search results
4.2 Payment Link transaction status
A Payment Link can have one of the following statuses:
| EXECWAIT | The payment link is not yet open |
| PREPROCESS | The payment link has been opened |
| EXECWAIT_TIMEDOUT | The payment link has expired |
| CANCELLED | Invalid button pressed |
| PREPROCESS_TIMEDOUT | The client has not made payment yet. The link can be opened again until its validity period is over. |
4.3 4.2 Transaction’s result in merchant’s system
If merchant has an e-shop already integrated with the Payment Gateway, and Paylink confirm URL & Paylink cancel URL configuration items are set, the result of a Paylink Payment Transaction will be sent to the corresponding URL, allowing the merchant’s system to be aware of the status of the transaction.
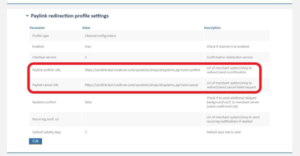
Image 17. Example Paylink confirm/cancel URL’s
5. 5. Success and error return pages
Default pages for customers are available (image 18):
– Default “Thank you” page
– Default “Unsuccessful payment” page
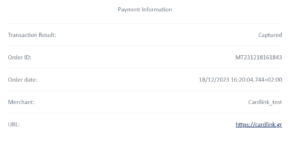
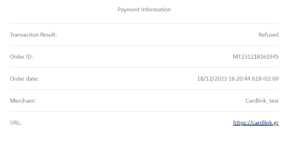
Image 18: Default success and error return page
6. Additional tools
6.1 Tokenization
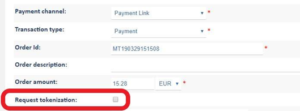
Image 19. Request Token Field
Given that custom success/failure URLs have been set and the merchant is respectively configured, then there is an extra field available in Payment Link creation, as shown in image 19.
If checked, when the customer completes the payment, the response sent on the Paylink confirm URL will also contain a token value. With that service, the next time the same customer makes a transaction through the same merchant – either via the e-shop or via Mo/To (not Payment Link) – the payment won’t require the card’s PAN and CVV as the token will be used.